Thursday, September 8, 2011

TWA - The Seating Cards

So The Wedding Archives continue...
with the seating cards.
We made the seating cards using the same stamps and stains that we used for making the invitations.
But we had this idea to use pine cones as seating card holders. And here goes a special thanks to my hubbies parents, who collected the pine cones for us :)
And actually a huge thanks goes to them for making most of the seating cards too :)


And here you can see one of the busy fairies in action :)


 And here you can see a glimpse of our table decorations (which will be the next post)


 Until the next post,

Wednesday, September 7, 2011

The Wedding Archives (a.k.a. TWA ) - The Invitations

So it as been ages from my last post and it's for a reason, or couple of reasons. The first reason was school-school-school. I was doing my bachelor thesis and other busy things connected to school and got my bachelor degree in physiotherapy in the spring. So yeeyyy! for that.
But at the same time i was planning our wedding, so very hectic times.
Now we are back from our absolutely fantastic Honeymoon in Croatia (definitely the best place to spend your honeymoon) and i have time to put together some wedding-related posts.
And i decided to start with the invitations.
We had decided to hold the wedding at my parents' country place, so we wanted our invitations to have a rustic feel to them. So we bought some stamps and some stain in two colours - black and red. We wrote the names and addresses with the stamps and made some decorative stamps in the corners of the invitations.


 We had a very multilingual wedding (featured languages were Estonian, Finnish, Swedish and English), so we had to make our invitations in different languages also and "Kutsu" is invitation in Finnish.


We also sealed the envelopes with wax and a heart stamp :)


And my hubby made the cutest how-to-get-there-map ever!!


And a couple of quite bad quality pictures from the night we were making the magic happen.
It was way over midnight when we finished and as you may notice i had my hands (and arms) in the stamp stain ;D


Hope you have a wonderful day!

Friday, January 7, 2011

Coin Purses

So i decided to make coin-purses for some of my female-darlings as gifts for xmas :) The idea popped to my mind because i thought that i would need one myself starting from 1.january, because our new course starting from that day is Euro (Goodbye our lovely Kroon) and that means a lot of coins-coins-coins in our purses. I bought these silver purse frames from a local fabric store and they were sew-ons so it was super easy to hand-stitch them to the
baggies i had sewn before. I wanted all of the purses to look a bit different but still come from the same "species" so i stitched some lace(-flowers) to decorate them.
I must say that the purses came out a bit large but on the other hand it makes them a bit goofy and that's usually the way i like things to be ;D
I didn't get the time to make myself one yet but i definitely want to but i will use some other fabric(maybe from one of my purses i haven't used for a couple of years now) because the fabric i used for these nice coin-purses i actually bought to make a new (bigger ;P) handbag for myself.


Noticed the new design of my Ticklish Fingers? It took at least half a day and a lot of help from my soon-to-be-husband (thank You so much honey :* ) to make it happen...but We did it!
I was wandering through different crafting-blogs (once again instead of studying ..argh) and i found this link where there are toooons of different customized fonts AND you may download all of them for free!! Amazing !! So of course i found many-many fonts i absolutely adored :)) Next i saw that they have tutorials for how to use those fonts for customizing blogs. Firstly How to create a signature for your blog and secondly How to customize Blog Titles etc . We had some trouble with the last one but thank god i've got a bit of a computer-nerdy Honey sitting next to me, so he helped A Lot. And I Thank  www.kevinandamanda.com/ also A Lot because i got some fantastic fonts from there and the tutorials were also very useful.
Make sure you go and check out those Fonts(atleast if you want to customize your blog or need to make some cute invitations etc :))
Good Night!

Saturday, January 1, 2011

Snowflake curtain


Since it is the beginning of a new (and hopefully a better) year i start by wishing everybody a Very Happy New Year!!
It has been a busy-busy time in school so i haven't had any time to even think about posting something here but now i will.
Although The Holidays are almost over I want to post this Very simple idea to decorate your home for Christmas (perhaps next year)- a snowflake curtain.
The last time i made snowflakes was years ago so i had to look for some tutorials from the internet how to fold and cut the paper that the outcome would be snowflaky..and not blaah-flaky ;D


First take an A4 paper...
  

Fold it as shown in the picture below..
  

Cut off the remaining piece of paper
 This is what your paper should look after cutting the extra-part off
  

Now fold the paper in half as shown in the picture
   

Now you should be looking at a triangle like the one in the picture below
  

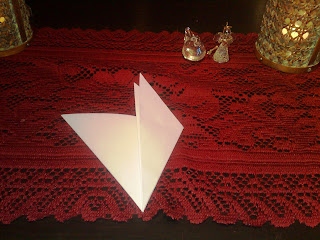
Now comes hardest part to explain.. you have to fold one side of the triangle little bit over the middle line of the triangle..
    

...and then do the same to the other side of the triangle, except that if the first side was folded towards yourself then the other side will be folded away from you. So one side will be folded to the front and the other to the back.
  

Now cut of the two tips...
  
 
 ..and snip-snip away.. mine looked this after cutting different shapes into the paper
      

..And this is what it looked after opening it :)) 
  

And I made a bunch of them with my boyfriend
  

And then i just took a needle and some thread and stitched them together to form a "curtain"  and ta-daa a simple way to decorate your home :)


I tried to make different sizes so the outcome wouldn't be so monotone
..And those oranges...just stick a bunch of  cloves into the oranges put a thread around them and let them hang- a nice decoration and an even nicer scent of Christmas :))

I did a lot of Ticklish Fingers stuff for presents this Christmas, hopefully i will get some pictures of them up soonish :))